
Snuggle Stripes: A Quilt for Comfort Cases
I love a scrappy quilt, especially one that’s quick, fun, and great for kids. This design idea had been waiting in my WIP pile and I finally found the perfect reason to try this style of block again!
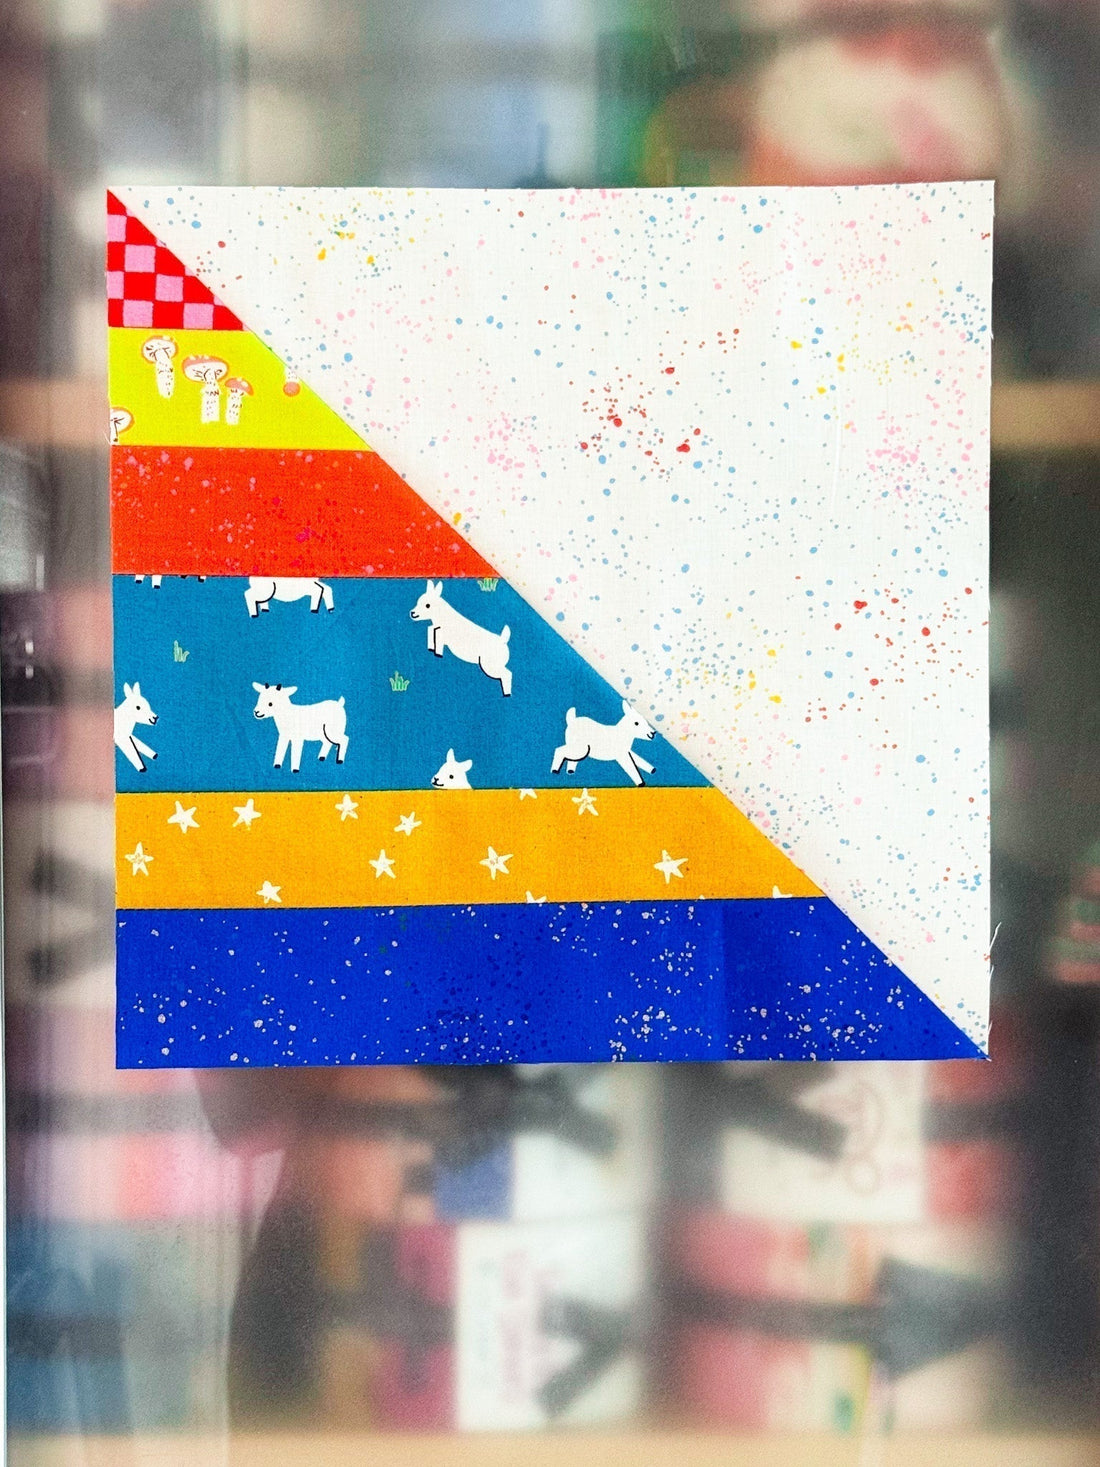
I’m excited to share the free quilt pattern for Snuggle Stripes—a striped half-square triangle (HST) block that’s jelly roll, stash, and scrap friendly!
When my 7-year-old found out this quilt was for kids, he had to be involved. He confidently told me, “Mom, I’m the expert on what kids like because I’m a kid.” Fair point! I explained that this quilt would be heading to Comfort Cases, a nationwide nonprofit that supports children entering foster care in all 50 states. Their mission is to bring dignity and hope by replacing trash bags with personal care packages filled with essentials like books, toiletries, pajamas and comfort items like a handmade quilt.

Cam took his expert job seriously—helping me pick out his favorite fabrics from my strip stash (a mix of strips, strings, and leftover jelly roll pieces). The Ruby Star Society Animal Animal goats were a must! We added in some fun Heather Ross and bright basics to add to our colorful collection. He arranged the strips, and I sewed them together. We had so much fun with this block I can’t wait to make a whole rainbow quilt together for Comfort Cases.

Want to make your own Snuggle Stripes quilt?
It’s quick, easy, and a great way to use up your stash while making something meaningful. See below for the block tutorial—I can’t wait to see what you create!
How to Make a Snuggle Stripes Block
This quilt block comes together quickly with fabric strips and a simple HST (half-square triangle) method. Here’s how you can make your own!
Step 1: Gather & Piece Your Strips
-
Collect fabric strips at least 11” long and between 1”–3” wide—jelly roll strips work perfectly!
-
 Sew them together along the long edges until you have a piece at least 11” wide.
 -
Press and trim your pieced unit to 10.5” x 10.5”.

Step 2: Pair with a Background Square
-
Cut a 10.5” square of contrasting fabric. We used Ruby Star Society Speckled in Confetti—one of my favorite blenders!
-
On the wrong side of the background square, draw a diagonal line from top left corner to bottom right corner.

Step 3: Sew & Cut
-
Place the background square right sides together (RST) with your striped unit, making sure the strips are oriented horizontally.
-
Stitch ¼” away from both sides of the drawn line.
-
Cut along the drawn line to create two striped HSTs.
Step 4: Press & Trim
-
Press seams toward the darker fabric.
-
Trim each block to 10” square.

For our quilt, we’re making a big kid-sized version—5 blocks wide by 5 blocks tall so we have some more blocks to make. We can’t wait to see yours!

1 comment
Nice pattern!